Showing posts with label tasty tuesdays. Show all posts

Thursday, September 10, 2009

{simply scrumptious} Brownies and a Blondie

These brownies will definitely fill your craving for something sweet, chocolatey, rich, and gooey. And, there's good news! I found this recipe in a Cooking Light magazine... so, hey, they're practically good for you! Health food! Right... right??

okay, so maybe not, but they're so decadent and yummy you won't actually care.
Photobucket

Dark Chocolate Cherry Brownies

3/4 cup flour
1 cup sugar
3/4 cup unsweetened cocoa
1 tsp baking powder
3/4 tsp salt
1/3 cup cherry preserves*
1/3 cup water
5 tbsp butter
1 large egg, lightly beaten
1 large egg white
1/3 cup semisweet chocolate chips
powdered sugar (optional)

Preheat oven to 350 degrees. Line a 9-inch square baking pan with parchment paper and coat with cooking spray (or, simply grease the pan really well-- I didn't use parchment paper and it was ok).
Combine flour, sugar, cocoa, baking powder and salt in a large bowl; stir with a whisk. Combine preserves, water, and butter in a small saucepan; bring to a boil. Add preserves mixture to flour mixture; stir well. Add egg and egg white. Stir until smooth. Stir in chocolate chips. Scrape batter into prepared pan and bake at 350 for 20-25 minutes or until a toothpick inserted in center comes out with a few moist crumbs. Cool in pan on wire rack. Sprinkle with powdered sugar, if desired.

*you can actually use any preserves you would like. I didn't have any cherry preserves on hand, but I did have blackberry, so I put that in instead. It was so good! I really want to try these with orange marmalade or raspberry... mmmm.

And while we're on the subject of things that are simply scrumptious, I would have to say that a blonde little girl in Pippi-like braids definitely falls into that category.
Photobucket
This was the first time I'd tried doing her hair in "pigtail braids"... I immediately fell in LOVE with how they stick out.
Photobucket


That's it for now! In my opinion, you should all go make some brownies. Because, you know, that's pretty much always a good thing.

Monday, July 20, 2009

{tasty tuesdays} the return! (well, sort of)

Hey, so, do you all remember back in the day when "tasty tuesdays" was something I did on this blog?? Wasn't that, like, eons ago??? :)

Obviously, that little feature fell by the wayside, due to pregnancy, a new baby, and laziness on my part in both cooking and posting. And I don't think I'd neccesarily do a great job keeping up even still, if I were to start it up again. But, I do miss it. I miss the motivation it gave me to seek out great recipes, and how fun it was to share them all with you and get feedback and opinions.

So!! I've decided to bring tasty tuesdays back, only not as tasty tuesdays. Instead, I'm going to call this feature "simply scrumptious" and just post a recipe whenever I have one I want to share, rather than committing to a specific day each week. Now THAT, I can handle.

To begin again, I give you a recipe for something any and all people love( right?):
COOKIES.
My brother Elijah is here visiting us right now (he helped me re-name tasty tuesdays!), and these are some of his favorites, which is why I had to bake them. And the hubby certainly didn't mind either...
Photobucket

Butterfinger Cookies

1/2 cup butter (no substitutes), softened
3/4 cup sugar
2/3 cup packed brown sugar
2 egg whites
1 1/4 cups peanut butter
1 1/2 teaspoons vanilla extract
1 cup all-purpose flour
1/2 tsp baking soda
1/4 tsp salt
5 Butterfinger candy bars (2.1 oz each), coarsely chopped

In a mixing bowl, cream butter and sugars. Add egg whites. beat well. Blend in peanut butter and vanilla. Combine flour, baking soda, and salt; add to creamed mixture and mix well. Stir in candy bars. Shape into 1 1/2 inch balls; place on greased baking sheets. Bake at 350 for 10-12 minutes or until golden brown. Cool on wire racks.

Chewy. Peanut-buttery. Chocolatey. SO YUM. You may want to plan a trip to the gym after you make these... I had to. :)

Tuesday, February 3, 2009

{tasty tuesdays} Pork Chops

I've been a terrible slacker when it comes to Tasty Tuesdays, lately... maybe that's because I've been a terrible slacker when it comes to cooking! Part of this is due to the fact that we had a serious lack of real groceries for a time (I kept putting off my "real" shopping trip) and part of it is due to the fact that it's very hard to want to cook or to know WHAT to cook when every food you eat results in awful heartburn right around the time you'd like to be going to bed. Tums have become a best friend of mine, let's just put it that way. :)


However, the other night, I finally broke out of my no-cooking, just-throw-something-together mode and made an actual recipe. These are so yummy, and amazingly quick and easy. Start to finish, they took me maybe 15 minutes. Now that's what I'm talking about!


Pork Tenderloin with Creamy Mustard Sauce

1 pound thin-sliced pork chops (or, use the thicker kind and pound them down a bit)

salt and fresh-ground black pepper

2 teaspoons olive oil

1/2 cup evaporated milk

2 tablespoons Dijon mustard

2-3 green onions, sliced

Heat oil in large skillet over med-high heat. Season pork on both sides with salt and pepper and place in hot oil. Cook on each side for 2 minutes or until browned and cooked through. Remove from skillet; set aside and keep warm.

Reduce heat to low. Add evaporated milk and stir to looked brown bits from bottom of skillet. Stir in mustard and green onions and cook, stirring frequently, for a few minutes. Return pork to skillet and cook for 1 to 2 minutes more or until sauce is slightly thickened, turning pork to coat with sauce. Serve pork chops with sauce spooned over the top.

Makes approx. 4 servings.

And for dinner tonight? Well, tonight, I don't have to cook! My honey and I are going on a date (let's hear a resounding YAY!!!). Caitlyn, always a sweetie, is coming over to watch the girls, and Jeremy and I are eating at this place and then seeing this movie. I'm so excited for date night that I may just burst into lots of happy little pieces!

Tuesday, January 13, 2009

{tasty tuesdays} Cupcakes!

This may not be the most practical (practicality, schmacticality, right?) Tasty Tuesdays ever, but I thought this recipe was worth sharing. I made cupcakes for Emma's birthday party-- strawberry, vanilla, and chocolate-- and the vanilla ones were actually my personal favorite. Besides, cupcakes are just so fun, aren't they?? When I think of "cheerful" or "happy" foods, a cupcake is one of the first things that comes to my mind.

Vanilla Cupcakes with Buttercream Frosting
1 cup unsalted butter, softened
2 cups sugar
4 large eggs, at room temperature
2 1/2 cups all-purpose flour
1 heaping teaspoon baking powder
1 cup milk
1 teaspoon vanilla

Buttercream Frosting
1 cup unsalted butter, very soft
7-8 cups confectioners' sugar
1/2 cup milk
2 teaspoons vanilla

Preheat oven to 350°. In a large bowl, on the medium speed of an electric mixer, cream the butter until smooth. Add the sugar gradually and beat until fluffy, about 3 minutes. Add the eggs one at a time, beating well after each addition. Combine the flour and baking powder and add in four parts, alternating with the milk and the vanilla extract, beating well after each addition.
Line two 12-cup muffin tins with cupcake papers. Spoon the batter into the cups about three-quarters full. Bake until the tops spring back when lightly touched, about 20 to 22 minutes.
Remove cupcakes from pans and cool completely on a rack before icing.
To make the icing - place the butter in a large mixing bowl. Add 4 cups of the sugar and then the milk and vanilla. Beat until smooth and creamy. Gradually add the remaining sugar, 1 cup at a time, until icing is thick enough to be of good spreading consistency (you may very well not need all of the sugar). If desired, add a few drops of food coloring and mix thoroughly.
Use and store icing at room temperature, as icing will set if chilled. Can store in an airtight container for up to three days. NOTE: this frosting recipe actually makes enough to frost more like 30-35 cupcakes, since I only doubled it and was able to frost all 60 cupcakes I made, with frosting left over!

As you can see, I left my frosting white and placed flowers I had piped in advance (made from a different frosting recipe I learned in a cake-decorating class) on top. Simple, but oh-so-girly and cute. Emma loved her cupcakes!
The beauty of cupcakes is how the possibilities are endless... if you go here, there are lots of really fun and super-cute ideas for decorating them. Or, get creative on your own. Either way, a cupcake is sure to make you smile.
Have fun! :)

ps. I would like to dedicate this post to MY cuppycake. hehe.

Tuesday, November 25, 2008

{tasty tuesdays} Thanksgiving dessert

Everyone knows that you have to have a pumpkin pie on Thanksgiving, right? (unless you are a crazy person and don't like pumpkin pie... cough*lydia*cough)
Sometimes though, it's a lot of work to make a pie. Mixin' all those ingredients, rollin' all that crust out, making sure things don't get too brown... er, well, that's about it, but still. If you LOVE pumpkin pie, but want a slightly easier pumpkin-y dessert, have I got a recipe for you.

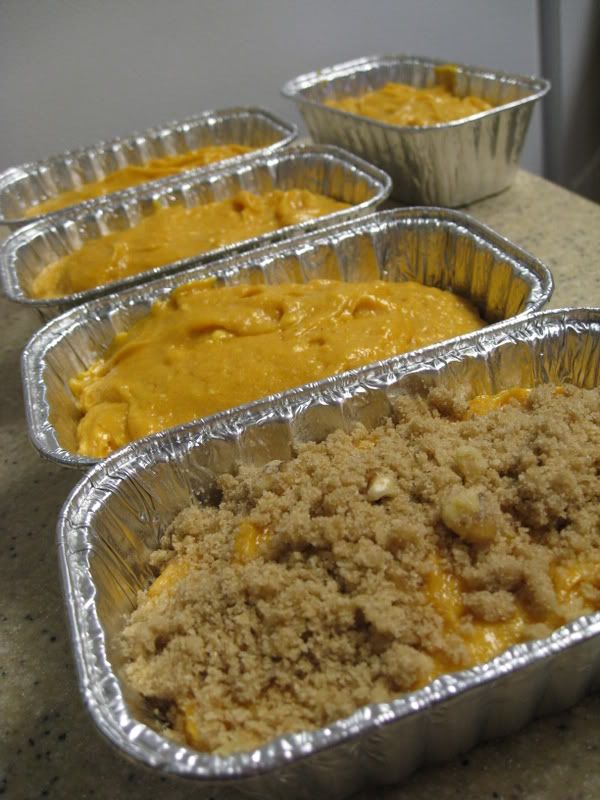
Kala's Pumpkin Pie Cake
(so named after the dear friend from whom I got this recipe)
1 large can pumpkin
1 cup sugar
3 eggs
1 can evaporated milk (12 oz.)
3 tsp. cinnamon
1 tsp. nutmeg
1 tsp. salt
1 box yellow cake mix
2 sticks butter (I never said it was healthy)
Mix first 7 ingredients and pour into a lightly greased 9x13 pan. Sprinkle the box of cake mix on top. Melt the butter and pour evenly over all.
Bake 50-60 minutes in a 350 degree oven, until set and golden brown on top.
Tastes great served with whipped cream, of course.
I don't have a picture to include, unfortunately, but I will be making this to take over to our family Thanksgiving (yay!), so if I remember to take one I'll stick it in here.
And now, just for fun, since this is a holiday-ish recipe, I thought I'd include this fun little holiday questionnaire that I found over at Ashley's.
Egg nog or hot chocolate? oh, I love them BOTH. I drink hot chocolate a lot this time of year, but egg nog is one of those special things I only allow myself a few times right around Christmas. It's better that way. (also, Jeremy hates egg nog, so I can't buy much more than one of those itty-bitty cartons)
Does Santa wrap presents or just sit them under the tree? well, I wrap presents and put them under the tree! I LOVE wrapping gifts and making them pretty and personalized. I love the sight of them sitting there under the tree, too.
Colored lights on tree/house or white? I like white on the tree, and a nice mixture of both outside. We always had colored lights growing up, and that's why I can't do completely without them.
Do you hang mistletoe? You know, I never have, actually! But I'm thinking I should, this year. I'm always glad of another excuse for smoochin'.
When do you put your decorations up? Right after Thanksgiving... or a teensy bit before. It depends. But I like them up as soon as possible so we can enjoy them that much longer! Our house feels so cozy and cheerful when it's decorated for Christmas... part of me never wants to put it all away.
Favorite holiday memory as a child? There are so many... but one of my favorites is when my brother Elijah and I would take our blankets and pillows downstairs by the tree, turn on the twinkly lights, and sleep there for the rest of the night. We did that every year for a long time, and it was always so magical. There was just something about creeping quietly through the chilly house when it was dark and everyone else was sleeping, then laying there cuddled up under our warm blankets, watching the lights make crazy patterns on the walls through the tree branches...
When and how did you learn the truth about Santa? Honestly, my parents never made a to-do about Santa, so I never thought he was real. There were never any shattered illusions to be had, in my case. :)
How do you decorate your Christmas tree? white lights, gold beaded garlands, and lots of blue, silver, white, and gold ornaments. And of course, all of our special "sentimental" ornaments are in there too, even if they don't match. :)
Snow! Love it or dread it? I love it, especially at Christmas-time. Although, I have to say that I'm kind of glad in some ways that we live in a place where we don't have to deal with it all. winter. long. I do wish it snowed here occasionally though... it's SO beautiful! Snow is a wonderment. Have you ever stood outside in a new-fallen snow and just felt the stillness and silence that blankets the world around you? Or seen how it turns the sky that amazing glowy color at night? Or walked through big, fluffy flakes as they fell, feeling them in your eyelashes and on your nose? Or woken up to a sunshiny day following a fresh snowfall, feeling so dazzled by the brightness and the sparkle and the the contrast of the blue blue sky with the white horizon that it hurts your eyes? Because if you haven't, you really should. It's amazing and there's nothing like it. I miss snow.
Do you remember your favorite gift? When I was 8 I received an American Girl Doll from my mom and dad (Samantha, because I thought she looked like me!). Also, one year not too long ago, my dad surprised me out of the blue and bought me a beautiful handmade scarf. It's still one of my favorites, and there's something so special about it because my dad picked it out all by himself, just for me. And of course, last Christmas, Jeremy surprised me with my little camera and now I can't imagine living without that thing!!
What’s the most important thing about the holidays for you? Celebrating Christ's coming to earth as we worship and sing joyful Christmas songs. The wonderful time we get to spend with any and all of our family.Teaching my kids about the true meaning of it all and why we celebrate Christmas, as well as passing on meaningful traditions to them, getting to see things through their eyes. Ahhh, I love it all!
What is your favorite holiday dessert? ummm, I don't know if I can pick just one... I'm kind of a pig when it comes to holiday desserts...
What is your favorite holiday tradition? Again, I don't know if I can pick just one! They are all so special in their own ways and mean so much to me, especially since they involve our dear family and the memories made with them.
What tops your tree? I don't really have a good tree topper... I need to find one I love. I think it's a star right now, though.
Which do you prefer, giving or receiving? Giving. It's so fun to try to find that perfect gift for the someones I love. But lately, we have been getting away from presents a little bit, keeping it simple and inexpensive, trying to do little tokens of thoughtfulness. Christmas isn't about the presents, and I really would love it if we could all just give to each other all year long as we see fit, and then there would be expectations or obligations come this time of year. But that's just me. :)
What is your favorite Christmas song? O Holy Night... so beautiful, and so powerful. And I LOVE singing it. But oh, I love almost all Christmas music. Joy to the World. Silent Night. Have Yourself a Merry Little Christmas. Gah, I need to go sing some carols RIGHT NOW!
Candy canes? Not to eat, but they sure are cute and I love to have them around. Also, it's so fun to see the kids eating them and getting all sticky!
Favorite Christmas movie? Elf is definitely up there. I can't help it, it's so funny. Little Women is another favorite for this time of year. Sigh. I love Christmas movies too.
What do you leave for Santa? nothing... but I do try to have a well-stocked goody pile in case any friends or family want to come on by!
Go ahead, fill this out yourself if you want too... it's fun and I'd love to read it.

Tuesday, November 11, 2008

{tasty tuesdays} Roasted Corn and Crab Soup

One of my favorite soup recipes ever. And it really is deceptively quick and easy!
image courtesy of bhg.com

Roasted Corn and Crab Soup

1 16 oz. package frozen whole kernel corn
2 cups chopped onions (2 large)
1 ½ cups coarsely chopped red sweet peppers
1 tablespoon cooking oil
4 14-oz. cans chicken broth
½ tsp dried thyme, crushed
1/8 to ¼ tsp ground red pepper
1/3 cup all-purpose flour
½ cup half-and-half or light cream
4 oz cooked crabmeat, cut into bite-size pieces (2/3 cup)*

Thaw frozen corn and pat dry with paper towels. Line a baking pan with foil and lightly grease. Spread corn in prepared pan. Bake in a 450 degree oven for 10 minutes; stir. Bake about 10 minutes more until golden brown, stirring once or twice. Remove from oven; set aside.

In a 4-quart Dutch oven or large pot cook onions and sweet peppers in hot oil over medium heat for 3-4 minutes or until nearly tender. Add roasted corn, 3cans of the broth, thyme, and red pepper. Bring to boiling; reduce heat. Simmer, uncovered, for 15 minutes.

In a large screw-top jar combine remaining 1 can broth and the flour. Cover and shake well; stir into soup. Cook and stir until slightly thickened and bubbly. Cook and stir one minute more. Stir in half-and-half; heat through. To serve, ladle soup into bowls; divide crabmeat among bowls.

*You can substitute imitation crabmeat for real; it’s all I’ve ever personally used in this recipe. I also like to use a little more than just 4 ounces, since I love crab :)

Go, and eat soup. Lots of yummy soup.


Thursday, November 6, 2008

playing catch-up

Yes, indeed, I have lots to catch up on! Where did this week go? It just flew right on by...

First things first: I've been so excited to pick my winner for the gender guess give-away! You all were so sweet to comment and leave your guesses, and like I already said, I loved hearing what everyone thought-- now, here is your due reward for all of that careful thought you put into those guesses.
Aaaaaand, actually, I know I said only those of you who guessed right would be getting a prize, but I just couldn't leave all you other people out. See how much I LOVE you all?? So yes, those of you who guessed "BOY" (15 total) were entered into a little drawing all your own! Let's start with that one.

the names go carefully into a bowl....

I screw my eyes shut tight (no pictures of that, it's no-make-up day), mix 'em up real good, and pull out a name:

And yay, it's the lovely Morgan, from over at Mrs. Priss! Here is your little prize, courtesy of the all-too-addictive-and-fun Etsy:

A sweet set of blue-bird notecards

(actually, on this particular prize, I was completely torn. Would you rather have this instead?? I think I'll leave it up to you...)

Just e-mail me your address, my dear, and I will have it shipped directly to you.

And now for the 10 of you who guessed (correctly, yay!) "GIRL".
A different set of names.... same bowl. But see, you can tell these are the "girl" names, because the bowl is wearing a cut lil' bow this time!

Eyes shut tight again and another name is drawn, and this time, it's...

Sweet Karen, from over at ThatMom.com (has a nice ring to it, doesn't it)! Hooray! How fun! And here's what you've won, also found on Etsy (or, The Place of Treasures Untold):

A lovely little pink birdie dish

I believe I already have your address, having asked your lovely daughter-in-law for it at some point, so your little giftie will be on its way quite soon.
Thank you, everyone, for playing along. You're all darlings!

Now that we have the prizes taken care of, it's time to post another belly shot. Here is my 21-week belly, taken on Sunday when I looked nice and presentable :)


I feel quite large lately, in all honesty, but that's ok; it means our little girl (whee, I love being able to say that) is growing healthy and strong. Of course, that doesn't account for the extra padding on my bottom and thighs, but I've chosen to ignore that part of my body until after the baby arrives. No problem, right?

Last but not least, I know I didn't post a Tasty Tuesday YET AGAIN, but I actually did have a recipe I really wanted to share this week! So I'm just going to go ahead and do it two days late. You'll be glad I did, trust me, when you taste this a.maz.ing bread. I think I ate a whole mini-loaf myself (hmm, come to think of it, THAT could account for the butt and thighs...).


Pumpkin Streusel Bread

1 2/3 cups all-purpose flour

1/4 tsp baking powder

1 tsp baking soda

1/8 tsp salt

1/2 tsp cinnamon

1/2 tsp nutmeg

1/3 cup butter, softened

1 1/3 cups granulated sugar

1/2 tsp vanilla

2 eggs

1 cup pumpkin puree

1/3 cup sherry

Streusel Topping:

2/3 cup brown sugar, packed

2 Tbsp butter, slightly softened

3 1/2 Tbsp flour

1/2 tsp ground ginger

1/4 cup chopped walnuts

Sift together dry ingredients. Set aside. Cream butter with sugar until light and fluffy. Add vanilla, eggs, and pumpkin puree. Beat well.

Mix pumpkin mixture with flour mixture and sherry. Blend just until ingredients are combined.

Pour into a greased and floured 9x5 inch loaf pan.

For streusel, cream butter with sugar. Add flour and ginger. Blend with hands to form small crumbles. Add walnuts.

Sprinkle streusel topping evenly over batter.

Bake at 350 degrees for 50-60 minutes, until toothpick inserted comes out clean. Cool on rack for 10 minutes, then remove from pan and allow to finish cooling.

Just look at that beautiful orange batter. It stays this lovely color when baked too.
As you can see, I actually like to bake mine in mini-loaf pans (found in the foil pan section of any grocery store) because the little loaves make such perfect and fun gifts to pass out. Also, I doubled the recipe (it uses up one whole smaller can of pumpkin that way), which makes 5 mini-loaves. Just remember to set your bake time for less, since they will get done faster!!

And, enjoy. This recipe is one my mom made for one of her amazing Christmas Open Houses, years ago, and it has been a favorite of mine ever since. Whether you want to keep it and eat every single crumb by yourself (and I wouldn't judge you if you did), or tie a pretty bow around it and make someone else's day with some home-baked goods...

... you will find that this is a perfect fall/holiday recipe too yummy to make only once.

Whew! That's enough for one day. Don't worry, those Disneyland pictures are still coming, as well as a blog about the Amazing and Wonderful week of adoption festivities...

just not today. :)

P.S. Look at what I saw in our paper this morning as I was flipping through the "Go and Do" section!


So exciting to see some names I know!! Ashley and Colleen are both such amazing photographers, and I couldn't be happier for them. Congratulations, girls! Do go and check out their show if you get a chance.

Tuesday, October 28, 2008

Tasty Tuesday, Ashley style!

Hey kids! I'm so excited to guest blog for the wonderful Talia while she's off galavanting in Disneyland! So without further ado, Tasty Tuesday! Yum!

Hello, my name is Ashley, and I'm a pizza addict. Yes, it's true, I'm obsessed. Chris and I probably eat pizza at least once a week. Sometimes we order, but my absolute favorite is when we make it. Mmmmm, delicious. I want to continue the tradition once Chris and I have kids and let them help make it and pick toppings. I'll either be known as the totally cool mom that makes pizza all or time, or the freaky weird mom that doesn't order pizza hut like a normal person. I'll keep you updated.. ;)

Anyway. Here is my favorite dough and sauce recipe. Toss together a quick salad, give your hubby a beer, and you've got a happy family. Enjoy! 


Pizza Dough

• 2 1/4 teaspoons active dry yeast
• 1 1/2 cups warm water
• 3 1/2 cups all-purpose flour, plus additional for rolling
• 2 teaspoons salt
• 1 scant tablespoon honey
• 1 tablespoon extra-virgin olive oil, plus some additional for coating the bowl/greasing the trays

In a large bowl, combine the yeast and warm water. Stir to dissolve the yeast and allow the mixture to rest for 5 minutes.
Mix half of the flour and yeast mixture and blend until smooth with your hands. Add the salt and honey and mix to blend. Sift in the remaining flour and mix to blend.
Knead for 5 minutes. Place the dough inside a lightly oiled large bowl. Cover with plastic wrap and let rest in a warm place, about 1 1/2 hours or until doubled in volume.
Roll out the dough.

Sauce

• 1 (4-ounce) can tomato paste
• 1 1/2 cups water
• 1/3 cup extra-virgin olive oil
• 1 tomato
• 2 cloves garlic, minced
• Salt and pepper
• 1/2 tablespoon chopped fresh oregano leaves
• 1/2 tablespoon chopped fresh basil leaves
• 1/2 tablespoon chopped fresh rosemary leaves

Mix everything together in a food processor. No cooking necessary, just spread on dough.

Put on whatever toppings you want. I used mozzarella and feta cheese and black olives. Bake at 450' for 8-10 mins.

Put in your tummy. Yummy.

Tuesday, October 21, 2008

{tasty tuesdays} a short hiatus

You may have noticed that Tasty Tuesdays has fallen by the wayside of late. It's already been two weeks since I last posted a recipe! (two weeks already?? wow) Well, don't get your hopes up too high, because you're not getting a recipe this week either. Things have been so busy lately that I haven't been cooking anything new and different, and I've been sticking to my old standby recipes, many of which I think I've already shared anyway. And if I did cook something new and different, I didn't remember to take pictures. So. There are my excuses. :)

Wait a minute, I completely forgot! I actually DO have some very special guest posters for today's edition. How could it have slipped my mind?? Silly me.

Our chefs today are none other than Emma and Annabelle, who have concocted these delightful desserts for you, straight from the ovens of the Lil' Pink Kitchen.


Emma's creation, a Pear Cake Surprise, is on the blue plate, and when asked to describe it, this is what she said:
"well, I put nuts in it. So it kind of tastes like nuts. And some cinnamon. It tastes like those two things!"
Delicious.
Annabelle's Pear Pie is in the pink dish. Please notice the careful placing of the little red cherry in the middle. When I asked her what it tasted like, she said:
"Ummmm.... it's good."
What more do we need to know?
Thanks, sweet girls, for helping mommy out this week.
I hope you all enjoyed this special edition of Tasty Tuesdays, and I'll be back soon... promise.

Wednesday, October 8, 2008

{tasty tuesdays} Two autumn recipes

Since this is a day late, I decided to make it up to you by posting not one but TWO recipes!! Good things come to those who wait, yes indeed.

I was quite happy yesterday because I got to bring dinner to my good friend Stacie whose third child was born a week ago. It was a great excuse not only to spend the afternoon cooking and enveloping my house in delicious smells, but also to hold her little daughter Lucy again, who just so happens to be one of the most adorable babies ever and positively makes me ga-ga.

As you all know, fall has been occupying my mind lately, so of course I picked two recipes that, to me, are very fall-ish. This first one has been a favorite of mine for some time, and I could simply eat these until I pop.
Cranberry-Nutmeg Scones

1 cup dried cranberries

1/3 cup warm water

3 cups all-purpose flour

1/3 cup granulated sugar-- plus 2 tsp sugar

2 1/2 tsp baking powder

3/4 tsp nutmeg, divided

1/2 tsp baking soda

1/4 tsp salt

1/2 cup butter, chilled, cut into 8 pieces

3/4 cup buttermilk (I always use this instead)

1/2 cup sour cream

2 tsp milk

Preheat oven to 400 degrees; grease baking sheets. Combine the cranberries and water in a small bowl; set aside.

Place the flour, 1/3 cup sugar, baking powder, 1/2 tsp nutmeg, baking soda, and salt in a mixer bowl.

Drain the cranberries and add to the flour mixture. Turn mixer to low speed and mix for about 15 seconds until the cranberries are coated with the flour mixture. Add the butter pieces. Continuing on low speed, mix for about 30 seconds, or until the butter is the size of peas. Stop and scrape the bowl.

Add the buttermilk and sour cream. Continuing on low speed, mix for about 30 seconds, or until a soft dough forms (it will be sticky).

Turn dough out onto a lightly floured surface and knead 4-5 times, using enough flour so it doesn't stick to your hands. Flatten dough out (I just use my hands) into a 1/2 inch thick circles.

Cut the dough with a 2-inch round cutter. Place the scones two inches apart on the baking sheets. Combine the remaining 2 tsp sugar and 1/4 tsp nutmeg; mix well. Brush the tops of the scones with milk and sprinkle with the sugar mixture.

Bake for 12-15 minutes, or until light golden brown. Delicious served slightly warm. Makes approximately 12 scones.

Note: if desired, pat all of the dough into a 9-inch round on a greased baking sheet. Using a floured knife, cut the dough all the way through into 8 wedges; do not separate the wedges. Brush with milk and sprinkle with the sugar mixtures. Bake at 400 for 20-30 minutes or until light golden brown. (this makes for some very LARGE scones, so I prefer the previous method, even though this one is a bit less labor.)

Breakfast this morning: one leftover scone, warmed slightly, with a steaming hot cup of vanilla chai tea. Ahhhh, perfect, especially when enjoyed with my morning devotions, in peace and quiet as my girls played outside

And now for the second recipe. Unfortunately, like a bad blogger, I forgot to take a picture of this before making my meal delivery, but I can tell you that it is one of my most favorite soups ever, and it is ridiculously easy to make.
Tortellini Meatball Soup
2 tablespoons butter
1 small onion, diced
2 cloves garlic, minced
salt and pepper
4 cups water
2 bouillon cubes
2 carrots, peeled and diced
1 1/2 to 2 cups dry tortellini pasta
1 can diced tomatoes, undrained
thyme and basil
12-16 frozen meatballs
shredded parmesan or mozzarella cheese
In large pot over medium heat, melt butter. Add onions and cook for several minutes before tossing in garlic. Season with salt and pepper (you can always add more later) and stir frequently while you let the garlic cook. Pour water into pot and turn heat to med-high. Bring to a light boil. Stir in bouillon cubes and carrots. Allow carrots to become semi-tender before adding tortellini. Immediately add can of diced tomatoes and season with thyme and basil. Reduce heat to medium. Allow soup to simmer, stirring occasionally, until tortellini is almost done (it's easy to overcook tortellini, so keep a close watch on it).
Meanwhile, prepare frozen meatballs in oven as according to package directions. Stir these in at the very last, when the soup has simmered for a little while and the tortellini is done.
Once you have ladled the soup into individual serving bowls, top with desired amount of shredded cheese.
This makes a good-sized pot of soup that is about 6 hearty servings.
Note: This is kind of a made-up, do-it-how-you-like-it recipe (from my mother-in-law), so as with most soups there is a lot of freedom as to what you can put in it. I've found that leaf spinach is a delicious addition, for example. Also, the way I make it, it tends to be low on broth and thick with all the other good things. If you prefer a "broth-ier" soup, you can simply use less tortellini and meatballs, or add more water. (you can also substitute chicken broth for the water and bouillon cubes)
What are some of YOUR favorite autumn recipes, all you comfort-food-loving cooks??


Monday, September 22, 2008

{tasty tuesdays} Fabulous Orange Cake

This was the dessert I made for a women's Bible study I hosted last week, and when I mentioned it, some of you said you hoped to see the recipe on here. I aim to please y'all, so here you go!

No picture of the whole cake... I forgot to snap one before we all devoured it. However, this way you can see how lovely and golden-y moist it is.

Fabulous Orange Cake

1 box yellow cake mix

1 package instant vanilla pudding mix (3.4 ounce)

2 cups sour cream

2 eggs

1/4 cup vegetable oil

1/4 cup orange liqueur (such as Triple Sec)

1 cup white chocolate chips

1/8 cup powdered sugar for dusting

Preheat oven to 350 degrees. Grease a 9-inch Bundt pan.

In a mixing bowl, stir together the cake mix and pudding mix. Add the sour cream, eggs, oil, and orange liqueur. Mix until smooth and well-blended, then fold in the white chocolate chips. Pour the mixture into the prepared pan.

Bake for 50 minutes to 1 hour, depending upon your oven, until the cake springs back to the touch. Remove from oven and allow to cool for 10 minutes in the pan, then turn out onto a wire rack to cool completely. When cake is cool, place on a (cute!) cake stand or plate and dust with powdered sugar before serving.

ps. No, I did not rename this recipe, it really was called Fabulous Orange Cake!

Tuesday, September 16, 2008

{tasty tuesdays} Lemon-Shrimp Linguine with Pesto Sauce

I made this for dinner one night last week, and I have to say this is a super easy recipe! It's pretty yummy too. Someday, I'd love to try making my own pesto and using that instead of store-bought-- you can't beat fresh pesto sauce. However, buying it pre-made really keeps it quick and simple.

Lemon-Shrimp Linguine with Pesto Sauce

1 package (9 oz.) linguine pasta, cooked according to package directions, drained, and kept warm

8 oz. raw medium shrimp*

lemon juice

1 container (7 oz.) refrigerated pesto with basil

1 1/2 tsp. grated lemon peel

2 tablespoons thinly sliced green onion

In a non-stick frying pan over medium heat, squeeze a bit of lemon juice (cut a wedge from the same lemon which you will be zesting). Add shrimp and cook, tossing frequently, until shrimp is just turned pink. Remove the shrimp from the pan into a dish, keeping warm. Next, combine pesto sauce and lemon peel in the same saucepan. Cook over medium-low heat, stirring frequently, for 6-8 minutes or until heated through. Transfer cooked pasta to serving plates. Top with heated sauce and warm shrimp. Sprinkle with green onion (I didn't do this, as you may have noticed, because I was out of green onions. Oops.)

*Note: you can use already-cooked shrimp, if you prefer, to make it even easier. Simply skip the shrimp-cooking step and instead stir it into the pesto sauce for the last couple minutes of heating to warm it, then serve as directed.


Tuesday, September 2, 2008

{tasty tuesdays} a la Lorie!!

Today, dear readers, we have a special treat. The lovely Lorie called me yesterday, and offered to take over Tasty Tuesdays for me today... not only because well, she is just that sweet and thoughtful, but also because she had made a very yummy dish and documented it quite carefully. I was only too happy to have her fulfill my blogging duties, which you all know I have been sadly lacking in as of late. :)

And now, go check out her delicious pot-pie recipe that seriously had my mouth watering even though it is only ten in the morning. Not to mention that she totally and completely outdid my plain little tuesday posts with all her lovely pictures and step-by-step commentary. A special treat, indeed!!

Thank you, sweet Lorie!


p.s. Speaking of Lorie, I don't believe I ever shared with you what happened the last time we got together... and I have just been waiting for an excuse to post these pictures (sorry, Lorie :)), so here you go:


Isn't she cute?!

There we were, in her living room, no make-up on and our hair undone, both of us in our undies at one point, trying on bags and bags of clothes. Of course, there was no silliness whatsoever... we're mature adults, with kids, for pete's sake. We would NEVER be silly.

Tuesday, August 19, 2008

{tasty tuesdays} Ginger Peach Tea

This is a drink that I first made long ago when my mom was hosting a women's morning fellowship group every Saturday-- it was a brunch affair. Yay, brunch! I think my mom made this recipe up....? Wherever it came from, it was an instant hit with all the ladies, and I've made it many times since then for lots of different occasions. I hadn't made it in years and years, but it popped back into my mind when I was trying to think of a refreshing non-alcoholic drink I could make for Jeremy's party-- after all, us pregnant girls didn't want to miss out on drinking something! This is always tasty and refreshing.

Ginger Peach Tea
1 can frozen white-grape peach juice concentrate, thawed
water
2 heaping tablespoons instant iced tea, unsweetened
2-liters ginger ale
In punch bowl, or VERY large pitcher, mix water with concentrate according to directions on can. Stir in instant iced tea granules, until dissolved completely. Gently and slowly pour in ginger ale. Stir a few times with a spoon to make sure it is all mixed together.
Serve chilled, over ice. If desired, garnish with fresh peach slices in bowl or on glass.

Tuesday, August 12, 2008

{tasty tuesdays} Too much goodness.

As promised, I am about to share with you what might possibly be one of the most delicious recipes of all time. I think Wishcake said it best:

"I tell you, there is nothing closer to heaven than the combination of chocolate and peanut butter. Amen. "

Ok, so that might be a slight exaggeration. But, combine chocolate and peanut butter, add in cream cheese, oreos and reeses peanut butter cups, and well.... need I say more?

I have to say that this dessert made a great substitute for birthday cake, too. Jeremy is not really a huge cake fan, so this was the perfect way to top off our evening. We even stuck birthday candles in it! Of course, in all the hullabaloo of the evening, I completely forgot to take a picture of it... and an online search for a picture of something similar yielded nothing. So, please excuse the poor quality of this photo, as it is nothing but a picture taken of the picture in my cookbook. :) It still looks yummy though!

Too-Much-Yummy-Goodness Dessert

(yes, I renamed it, before it was titled Peanut Butter Chocolate Dessert... boring)

20 chocolate cream-filled chocolate sandwich cookies, divided

2 Tbsp butter or margarine, melted
1 package (8 ounces) 1/3-less fat cream cheese, softened*
1/2 cup peanut butter
1 1/3 cups powdered sugar, divided
1 carton (16 ounces) light frozen whipped topping, thawed, divided*
15 miniature peanut butter cups, coarsely chopped
1 cup fat-free cold milk*
1 package (small box) instant chocolate fudge fat-free sugar-free pudding mix*

Finely crush 16 cookies; toss with butter. Press onto the bottom of an ungreased 9-in. square dish. In a mixing bowl, beat the cream cheese, peanut butter, and 1 cup powdered sugar until smooth. Fold in half of the whipped topping. Spread over crust. Sprinkle with peanut butter cups.

In another mixing bowl, beat the milk, pudding mix, and remaining powdered sugar on low speed for 2 minutes, until smooth and slightly set. Fold in remaining whipped topping. Spread over peanut butter cups. Crush remaining cookies and sprinkle over top of dessert. Cover and chill for at least three hours before serving.

Note: you can double this recipe and make it in a 9x13 pan... it fits perfectly.

*I chose to use the low-fat or fat-free versions of these things, even though the original recipe didn't call for them. But it still tasted AMAZING! Of course, if you wish to use regular milk, pudding, cream cheese, etc., that is just fine... just a warning though, it was extremely rich even with the lighter versions.

In other dessert-y news, these are entirely too much of a temptation for me right now:


Hey, it's protein, right.... ?? :)

Tuesday, July 22, 2008

{tasty tuesdays} Easy Orange Chicken

Who says Tasty Tuesdays has to be a recipe? It just has to be tasty, right?? (work with me here, folks....)

Just ask my husband... there has not been much spectacular cooking (or any kind of cooking, really) going on lately in our house. I've never enjoyed cooking in the summer anyway since it is so hot, and being pregnant with zero energy and not really knowing what, if anything, sounds good, certainly does not help. But! I think I may have come across something that saves us all. It's inexpensive, it's easy, it seems like a home-cooked meal, and it is oh-so-delish.


Trader Joe's frozen orange chicken. I made it last night with some steamed rice and a salad, and it was the perfect meal. I think my poor husband was just glad to be eating something other than fast-food, frozen pizza, or sandwiches. :)

I'm definitely going to try to find some more options like this to have on hand. It was just the right amount of cooking required, a lot healthier, and I felt like a much more accomplished mom and wife feeding my family a nice sit-down meal rather than another night of getting food from somewhere.

If you have a Trader Joe's near you, I recommend you pick some of this up and try it. Your taste buds will be quite pleased.

Tuesday, July 15, 2008

{tasty tuesdays} Chicken- Spinach Rice Bowls

There is something I must tell you about this week's recipe: to be 100% completely honest, my darling husband did NOT like this meal. I thought it quite tasty, however, and the kids even ate it. Besides, it is quick and easy for a relatively healthy meal. In my book, that's a winner. But, I would love to know what all of YOU think. Here's the recipe, and please don't be afraid to give me your reviews! :)

Chicken-Spinach Rice Bowls
Desired amount of rice (I used basmati long-grain rice, but you could do this with any kind, even brown or wild)
1 large chicken breast, cubed
salt and pepper
1 clove garlic, minced
approx. 3 cups fresh spinach leaves
1 can healthy request cream of mushroom soup
pinch of tarragon
Cook rice according to package directions. While rice is cooking, saute chicken over med-high heat in large frying pan with a small amount of olive oil. Season with salt and pepper. Right before chicken is done, add in garlic. Reduce heat and finish cooking chicken completely. Add spinach and cook for about 5 minutes, gently stirring and tossing. In a separate small bowl, whisk soup with one half can milk or water. Stir in tarragon. Once spinach has cooked down slightly, add soup mixture to the frying pan and cook over low heat until heated through. Taste and add any extra seasonings you think it might need. Place cooked rice in bowls and top with the chicken and spinach. Bon appetit!
How would you tweak it? Would you add or leave anything out?

Wednesday, July 9, 2008

{tasty tuesdays}... on a Wednesday!

As you might have noticed, "tasty tuesdays" have somehow fallen by the wayside these last couple of weeks. My apologies. I had a recipe in mind to post yesterday, actually... and then I was up sick most of the night on Monday, which left me completely wiped and exhausted on Tuesday. There was a major flu bug that made it's way through our little circle after all our families spent so much time together over the 4th of July weekend... ugh, not fun. Poor dears. But, I think we are all better now!

And even though it is Wednesday, I am still going to post this week's recipe. It's a good one. We had a family brunch on Saturday morning here at my house-- it was so wonderful and relaxing-- and this was what I made. It was so good (I'm not trying to toot my own horn-- it's truly just a delicious recipe, that's all) I didn't even manage to snap a picture of it before it was half gone! It is not healthy, but if you are looking for a tasty breakfast splurge-- here it is. :)

French Toast Casserole

1 loaf french bread, cut in 20 slices

8 eggs

2 cups half-and-half (I used fat-free)

1 cup milk

2 Tbsp sugar

1 tsp. vanilla

1/4 tsp. cinnamon

1/4 tsp. nutmeg

dash salt

Lay/ overlap bread slices in a well-greased 9x13 pan. Mix eggs, half and half, milk, sugar, vanilla, cinnamon, nutmeg, and salt with whisk until well-beaten. Pour mixtures over bread slices, making sure to spoon some between the slices too. You want ALL the bread to be well-coated. Cover pan and allow to soak overnight in refrigerator.

Praline mix:

2 sticks butter (I cut it down to 1 1/2), melted

1 cup brown sugar

1 cup chopped pecans (chopped walnuts also work well)

2 Tbsp light corn syrup

1/2 tsp cinnamon

1/2 tsp nutmeg

The next morning, heat over to 350 degrees. Make praline mix by mixing all ingredients together. Spread over bread slices, once again making sure to get some in between the slices too. Bake approximately 40 minutes, or until no longer soggy on top and edges.

Best served warm, with lots of lovely people to enjoy it with you!

Tuesday, June 24, 2008

{tasty tuesdays} Mini Mexican Pizzas


I can't really take credit for this idea. My good friend Kourtni, who is a pro at making yummy Mexican food, told me about this. I thought of it again the other night as I rummaged through my cupboards looking for dinner ideas and tried it for the first time. They were delicious! And so very easy--my kind of cooking for sure. I also love that they can be so adaptable-- want to make a bigger one? Use a different size tortilla! Don't like refried beans? Just leave them off! Happen to have some fresh cilantro? Chop it up and throw it on there! Want to make a no-fat version? Just... well, um, I'm afraid I can't help you there. But you get the idea. :)


Mini Mexican Pizzas

taco seasoning packet
ground beef or turkey
small size tortillas, flour or corn
can of refried beans
shredded cheese
roma tomato
avocado
salt and pepper
Preheat oven to 375 degrees. Cook ground meat in taco seasoning according to packet directions. Meanwhile, spread desired amount of refried beans on tortillas. When meat is fully cooked, drain well and spoon a layer on top of beans. Top with shredded cheese. Place in oven for 5-10 minutes, or until cheese is thoroughly melted and edge of tortilla is crispy. Meanwhile, chop tomato into small chunks and mash the avocado, stirring in salt and pepper to taste. (get creative here-- what other flavors would you like? Green chiles, lime, cilantro, garlic-- whatever you want, add it in) Remove tortillas from oven and top with chopped tomatoes and avocado mash. Serve warm and enjoy!
Special note: my next post is my 100th! Be sure to check back later this week, because I have something very special planned for all you dears in honor of the occasion.


Tuesday, June 10, 2008

{tasty tuesdays} Strawberry Pizza

With the summer upon us and strawberry stands popping up all over the roadsides, there is every good excuse to make a dessert like this. Refreshing and light, pretty and colorful, this concoction is the perfect way to make use of those delicious and beautiful berries. I've loved this recipe for a long time, ever since my mom first made it years ago, and it remains a favorite I just have to make at least once a year. I can guarantee it will make your taste buds go "OH WOW, THAT IS SOOOO GOOD!" Really!

Please note: I cannot take credit for this oh-so-cute picture-- it is courtesy of google images. Since I haven't actually made this recipe in a while I didn't have any pictures of my own to use. But it looks exactly like this!


Strawberry Pizza
Crust:
1/2 cup butter
3/4 cup sugar
1 egg
1 1/2 cups flour
1 tsp. cream of tartar
1/2 tsp. baking soda
1/8 tsp. salt

Mix first three ingredients well, then add remaining four. Press onto a greased pizza pan. Bake at 400 degrees for 10 minutes, or until very slightly golden brown. Do not overbake! Allow to cool before topping.

Filling:
8 oz. cream cheese, softened
1/2 cup powdered sugar

In small mixing bowl, beat together until smooth and creamy without any lumps. Spread evenly over baked and cooled crust.

Topping:
3 oz. strawberry gelatin
1/2 cup sugar
dash salt
1 cup water, divided
4 Tbsp cornstarch
4 cups sliced strawberries

Combine gelatin, sugar, salt, and 1/2 cup water. Dissolve cornstarch in remaining water and stir into gelatin mixture. Cook over medium heat until thickened and starch turns clear. Stir in strawberries until completely coated. Allow to cool before spreading it on top of filling. Chill pizza in refrigerator for at least an hour before serving.